Batch logo upload with Epson Deployment Tool
RELATES TO:
In this article we will look and see how the Epson Deployment Tool can be utilised to batch update logos stored in the NV memory of the TM POS printer. Using the TM printer utility and creating a .tlg file from the stored logos we can then execute a command that will transfer the new logo file across all printers listed on the network (Lan or Wi-Fi). For this example, we are going to use the TM-T20II utility, but this can be used with many other Epson TM printers using the dedicated TM Utility for the model in use.
Supported Printers:
- TM-T20 Series
- TM-T88 Series
- TM-m30 Series
- TM-m50
- TM-L100
EXPLANATION:
The Epson Deployment Tool allows a backup of one printer which can be distributed across multiple printers. It allows the installation of logos to a lot of printers efficiently. This tool comes with a command line interface tool where printer settings can be backed up via the TM-XX utility and restored on other TM printers. By using this CLI tool instead of a full backup file we can send a logo export (.tlg) to all printers which replaces any logos stored.
To start this process please download the Epson TM-XX Utility for the printer that will be having its logo changed. Follow the link below to access Epson-Biz where you can download the TM-XX utility for the printer logos to be changed.
https://download.epson-biz.com/modules/pos/
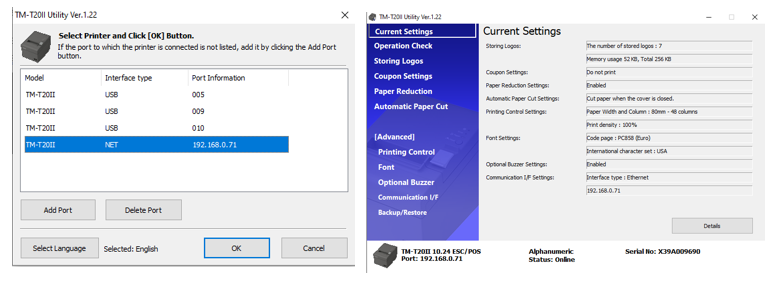
Once the TM-XX Utility is installed, find this in your programs and run the utility. See figure 1 where the TM-XX Utility can be found and how the initial screen looks.

The next step is to add the port that you will use to communicate with the printer to make the logo backup file. For this demo we will use Ethernet and the IP address of the printer. Please see figure 2 below. Once you have pressed Ok it will communicate to the printer, retrieve all the current settings, and load the utility GUI.
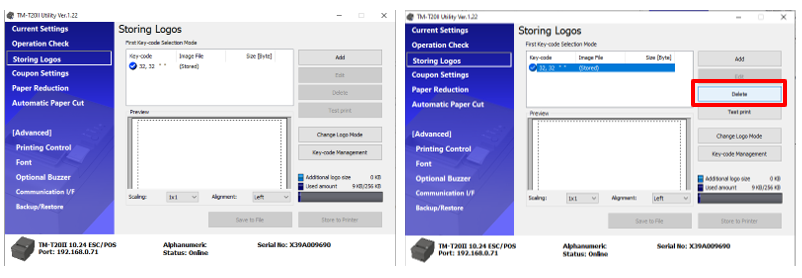
Now the GUI has fully loaded and communicating with the printer, navigate to the option on the left called “Storing Logos”. This will show what logos are currently stored in the printer. If any logos are stored, please proceed to delete these by selecting the logo and pressing the delete button. See figure 3 on this procedure. Please repeat for each logo if more than one is stored.
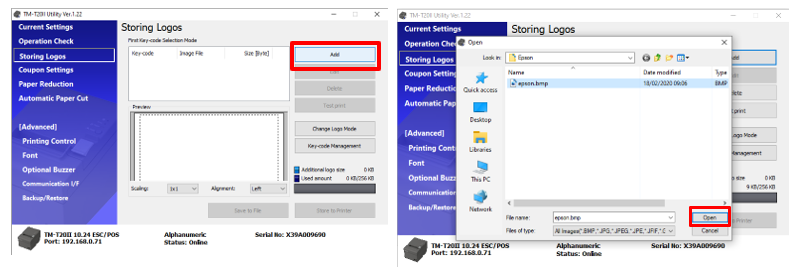
Now that the printer is free from any unwanted/old logos it is now time to add the new logos to the TM Printer. To do this its very quick and easy, so the first step is to press the “add” button on the right hand side of the utility. This then opens the windows file browser where to can navigate to the logo(s) you want to add. Select the logo you which is to be stored in the TM Printer and press “Open”. See figure 4 on adding/browsing for the logos to be added via the utility.
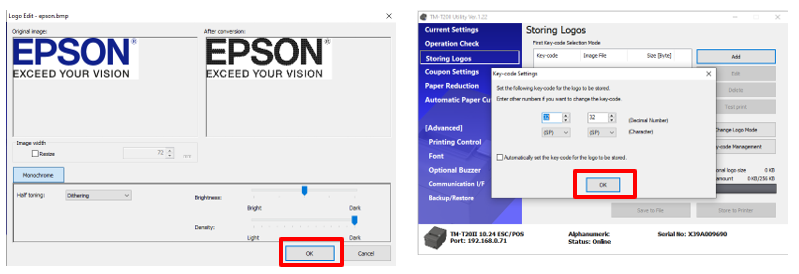
The next step now we have opened the logo image file in the TM-XX Utility is to edit the brightness and density if required and press Ok. This can be seen in figure 5 where slider bars are used to edit these settings. The overall goal is to change the logo into a monochrome image. Also, if the image needs to be resized this can take place in this section. In figure 5 it also shows the next screen once “Ok” has been selected on the image editing screen. This shows how to set the key codes of the image. These are the values used to print the logo stored in the printer. This also allows multiple logos to be stored and printed with different key codes. To finalise and save the logo in the utility press “Ok”.
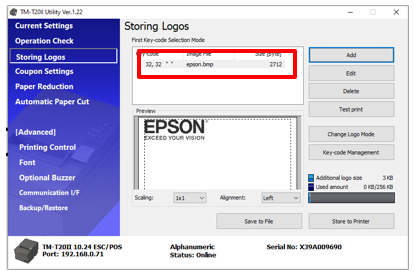
Now in the utility it will show the new logo added with the key codes selected in the previous screen in figure 5. If more logos need to be added please repeat the previous two steps picking a combination of two unique key codes for each logo stored. See figure 6 where it shows the logo was added successfully with key codes 32,32.
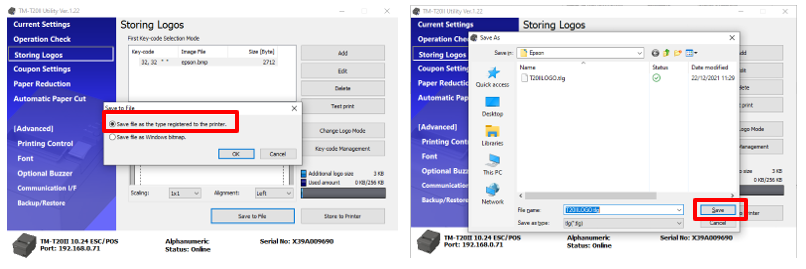
In this step we will now look at saving the logos and their settings to a file which we will upload to the printer using the Epson Deployment Tool. In figure 7 when the “save to file” has been selected a pop up will be displayed. Select “Save file as the type registered to the printer” and press “Ok”. This will then allow you to save the file as a .tlg. Pick the destination and the file name can be modified and press “save”.
Now a .tlg file has been created that holds all the logo data we now need to get that file transferred and unloaded to the printer/s. First step is to visit Epson-Biz and download the Epson Deployment Tool which can be found from the URL below.
https://download.epson-biz.com/?content=uti_deployment
Install this program on your Windows system and once installed please navigate to the following file address which is where the files from the Epson Deployment Tool is located.
C:\Program Files (x86)\EPSON\DeploymentTool\PrinterDeployment\PrinterSettingChanger
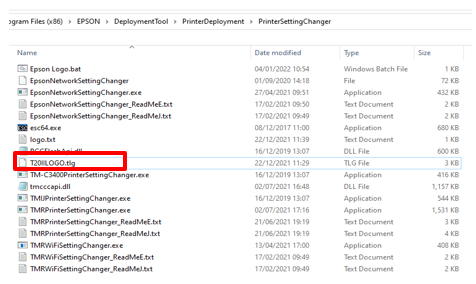
Please now copy your .tlg file to this location which will be used and transferred using the command line program supplied with the Epson Deployment Tool. See figure 8 on where the file needs to be copied to.
Now that the .tlg file is copied to the Epson Deployment Tool location the next step is to create a batch file in this same location which contains any printer accessible and assign what .tlg file you wish to upload to what printer. Please see below a snippet example of the batch file used to complete the upload to two IP network printers.
@echo on
TMRPrinterSettingChanger -e192.168.0.71 T20IILOGO.tlg
TMRPrinterSettingChanger -e192.168.0.72 T20IILOGO.tlg
The next step once the batch file has been created is to run this. This will take the .tlg file assigned and connect to each printer listed. Once connected the .tlg file is uploaded to the printer. The logo in these printers will be replaced by what is stored in the .tlg file.
In the final optional step, the new logos are stored, and a test print can be actioned using the printer’s Windows utility.