How to Fix Print Quality Issues on Epson Inkjet Printers
Applies To
-
Operating Systems: Windows 10, Windows 11, macOS
-
Hardware: Epson Inkjet Printer covering EcoTank, Expression, and WorkForce Series Printers (e.g., ET-4950, ET-4850, L6390, XP-2200, and other inkjet models)
-
Software: Epson Printer Driver
Description
If your Epson inkjet printer is printing blank pages, has blurry text, or is missing a colour (for example, yellow, cyan, magenta, or black), run a Nozzle Check followed by Head Cleaning via the printer driver Maintenance menu. For severe clogs, a Power Cleaning may be required (for models where this feature is available).
Symptoms
Perform these steps if your printer exhibits any of the following issues:
-
Faint Output: Printed text or images appear faded or light.
-
Banding: Horizontal white lines or streaks appearing across the page.
-
Incorrect or Missing Colours: One or more colours — yellow, cyan, magenta, or black — are missing, faint, or look distorted in printed output.
-
Blank Pages: The printer runs, but no ink appears on the paper.
-
Broken Nozzle Pattern: A Nozzle Check printout shows gaps or missing segments.
Solution
1. Preparation and Safety
-
Check Ink Levels: Ensure all ink tanks are filled above the lower limit line. Running cleaning cycles with low ink can damage the printer.
-
Power Management: Do not turn off the printer or open the scanner unit during a cleaning cycle.
-
Paper: Load a few sheets of plain paper into the rear feed or paper cassette.
2. Accessing the Maintenance Menu
The cleaning utilities are located in the printer driver settings. Use the quick reference table below, or the detailed steps for your operating system further down.
Quick Reference: Path by Operating System
| Operating System | Path to Maintenance / Utility Menu |
|---|---|
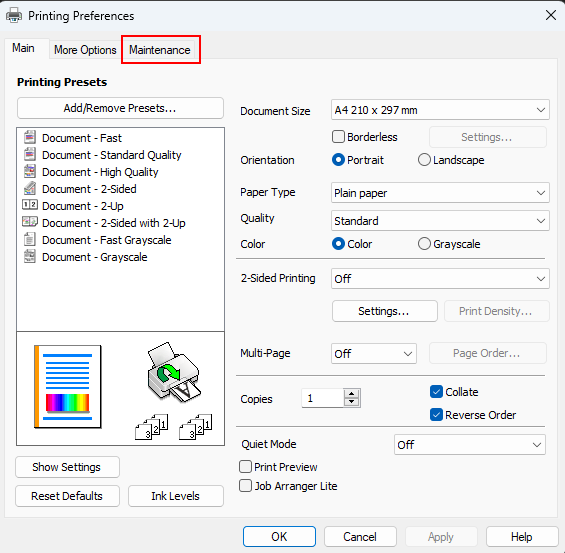
| Windows 11 | Start > Settings > Bluetooth & devices > Printers & scanners > [your Epson printer] > Printing Preferences > Maintenance tab |
| Windows 10 | Control Panel > Hardware and Sound > Devices and Printers > right-click [your Epson printer] > Printing Preferences > Maintenance tab |
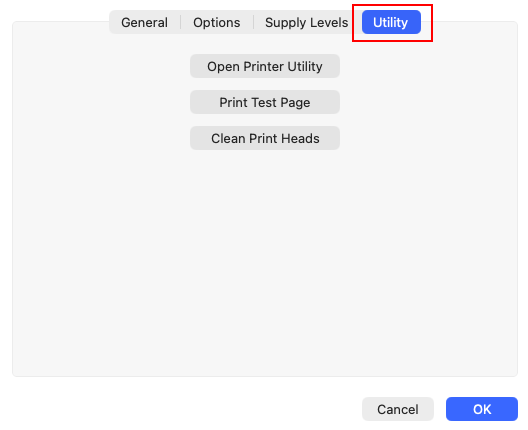
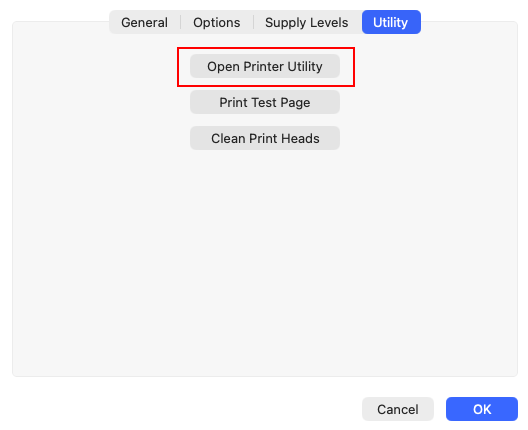
| macOS | Apple menu > System Settings (or System Preferences on older macOS) > Printers & Scanners > [your Epson printer] > Options & Supplies > Utility tab > Open Printer Utility |
Windows 11
-
Select Start.
-
Go to Settings > Bluetooth & devices > Printers & scanners.
-
Select your Epson Printer (e.g. ET‑4950).
-
Select Printing Preferences.
-
Open the Maintenance tab.
Windows 10
-
Open Control Panel.
-
Go to Hardware and Sound > View devices and printers.
-
Right‑click your Epson Printer (e.g., ET‑4950/L6390) and select Printing Preferences.
-
Open the Maintenance tab.
macOS
-
Open the Apple menu and choose System Settings (or System Preferences in older macOS versions).
-
Select Printers & Scanners (or Print & Scan / Print & Fax).
-
Choose your Epson Printer (e.g., ET‑4950/L6390) from the list.
-
Click Options & Supplies, then go to the Utility tab.
-
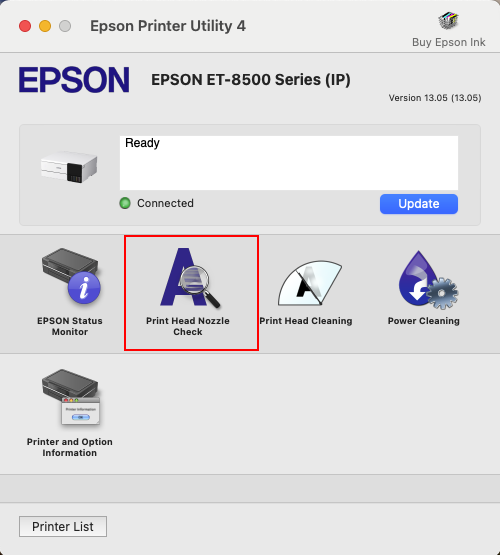
Click Open Printer Utility to access the Epson maintenance tools: Nozzle Check, Head Cleaning, and (if available) Power Cleaning.
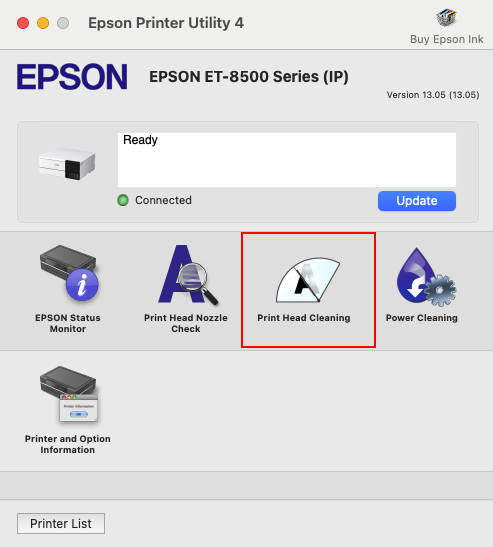
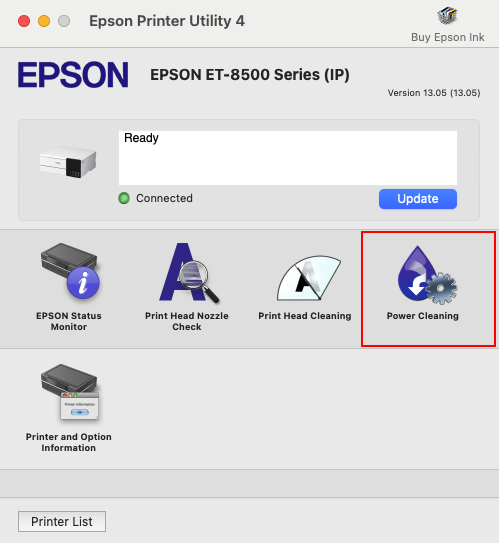
Cleaning Methods Overview
| Cleaning Type | When to Use | Description |
|---|---|---|
| Nozzle Check | Before & after cleaning | Prints a test pattern to identify clogging. |
| Head Cleaning | Mild/moderate clogging | Standard cleaning cycle to clear blocked nozzles. |
| Power Cleaning (if available) | Severe clogging or repeated failures | Deep clean that uses more ink. |
3. Cleaning Procedures
These steps apply to all supported operating systems. Open the menu identified for your OS in the Quick Reference table above: the Maintenance tab (Windows 11 / Windows 10) or the Printer Utility window (macOS).
Step A: Run a Nozzle Check
-
In the Maintenance tab (Windows) or Printer Utility window (macOS), click Nozzle Check.
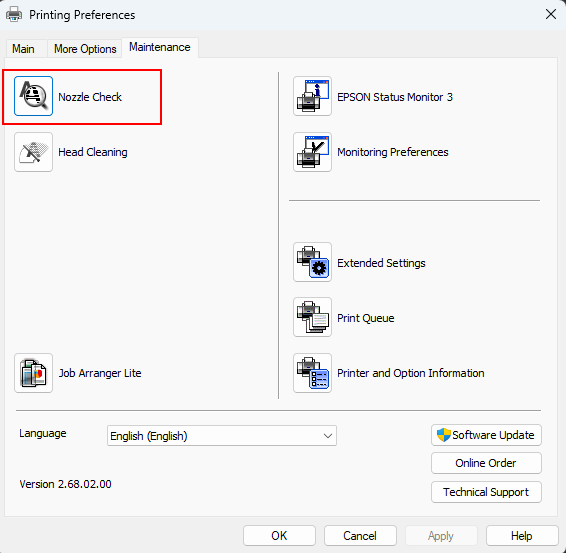
- Click Print.
-
For each colour, check the printed pattern against the example below to see if the print head nozzles are clogged.
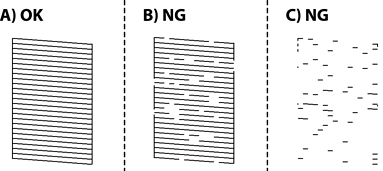
- A) OK: the horizontal lines print solid and unbroken, with no visible gaps — no further steps are needed.
- B) NG: the lines are mostly present, but show some visible gaps or breaks — proceed to Head Cleaning (Step B).
- C) NG: the lines are mostly broken up or fragmented, with large gaps throughout — proceed to Head Cleaning (Step B); if there's no improvement after cleaning, Power Cleaning (Step C) is likely needed.
-
The driver's Nozzle Check window also shows this comparison directly on screen alongside your printed result, letting you select the matching option and proceed straight to Head Cleaning from there if needed.
Note: The pattern shown above is a general example — the exact nozzle pattern can vary by printer model. For the most accurate comparison, follow the on-screen guidance in the driver's own Nozzle Check window, or check your product's user manual for a model-specific example.
Troubleshooting Matrix
| Symptom | Recommended Action |
|---|---|
| All lines are printed | No further steps are needed |
| Some nozzles are clogged (image B) | Perform Head Cleaning (Step B); repeat up to 3x |
| Blank page or most lines are missing (image C — more than 50% missing) | If available, perform Power Cleaning (Step C); otherwise perform Head Cleaning (Step B), repeat up to 3x |
| No improvement after 3 cleanings (Step B) | If available, perform Power Cleaning (Step C) |
Step B: Head Cleaning
-
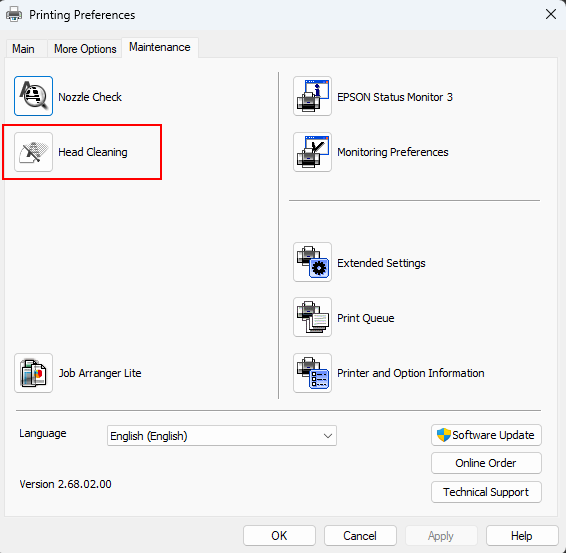
In the Maintenance tab (Windows) or Printer Utility window (macOS), click Head Cleaning / Print Head Cleaning. For some driver versions if a Maintenance button appears instead, click that first.
-
Click Start and wait for the process to complete (the power light will stop flashing).
-
Run another Nozzle Check. If the pattern is still broken, repeat this cleaning up to 3 times.
-
If print quality does not improve after a head cleaning:
-
If Power Cleaning is not available:
-
Turn the printer off using the printer's Power button. This ensures the print head is capped correctly to prevent it from drying out.
-
Wait 12 hours.
-
Repeat Head Cleaning (steps 1–3 above).
-
-
If Power Cleaning is available, continue to Step C.
-
Step C: Power Cleaning
-
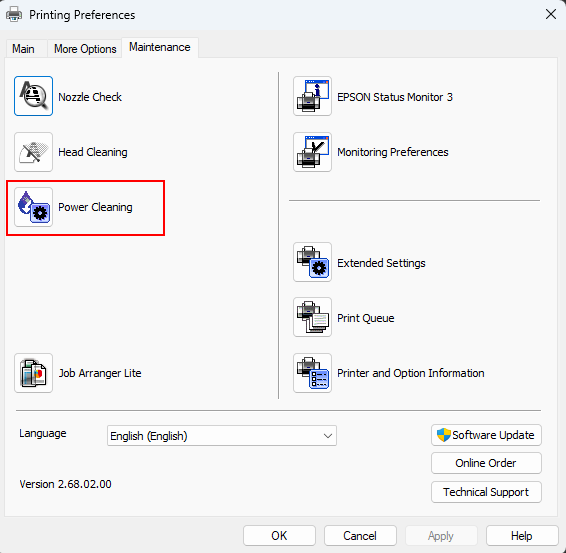
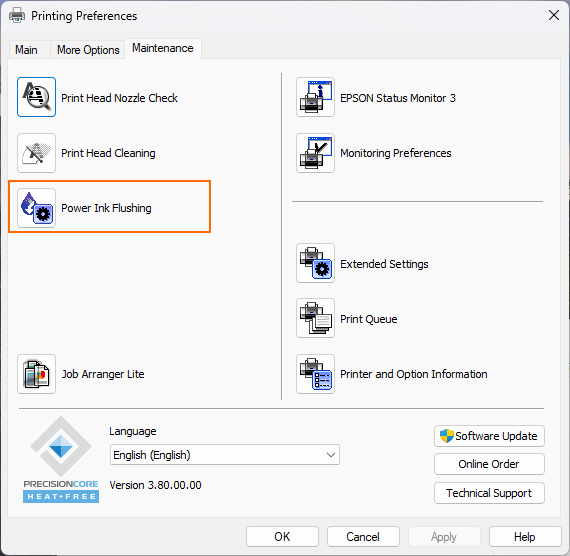
In the Maintenance tab (Windows) or Printer Utility window (macOS), click Power Cleaning or Power Ink Flushing. For some driver versions if a Maintenance button appears instead, click that first.
-
Follow the on-screen prompts. Ensure you have enough ink (at least 1/3 full).
-
Once finished, run a final Nozzle Check.
-
If print quality does not improve after a Power Cleaning:
-
Turn the printer off using the printer's Power button. This ensures the print head is capped correctly to prevent it from drying out.
-
Wait 12 hours. This allows trapped air to dissipate and dried ink to soften before trying one more standard cleaning.
-
How to Prevent Clogged Print Heads
-
Print Weekly: Print at least one colour test page per week to keep ink flowing.
-
Power Down Correctly: Always use the Power Button on the printer. This "caps" the print head to prevent it from drying out. Never unplug the power cable whilst the printer is on.
-
Environment: Avoid placing the printer in direct sunlight or near a heater, as heat evaporates ink in the nozzles.