How to print a Test Page in Windows
Applies To
- Operating Systems: Windows 11, Windows 10, Windows 8 (Windows only — this article does not cover macOS)
- Hardware: Any Epson printer with an installed Windows printer driver
- Software: Epson Printer Driver / Windows Printers & Scanners
- Related Articles:
Description
The Test Page function is a good way to test communication between the printer and computer. It is sent directly from the printer driver, which helps determine whether a printing problem is a communication issue or a problem with the specific application being used.
Select your operating system below and follow the steps.
Solution
Windows 11
- Click the Start button.
- Select Settings.
- In the Settings menu, click Bluetooth & devices.
-
Click Printers & scanners. The Printers & Scanners window opens; an icon for your Epson printer should be present.
Before continuing:
- Check the connection from the printer to the computer.
- Check the printer is powered on.
- Make sure there are no red or amber lights on the printer's LEDs, and no error messages on the LCD panel.
- Click on the name of the printer.
- In the Printers folder, first check the print queue is clear and the printer status is Ready — see KA-01084 for instructions.
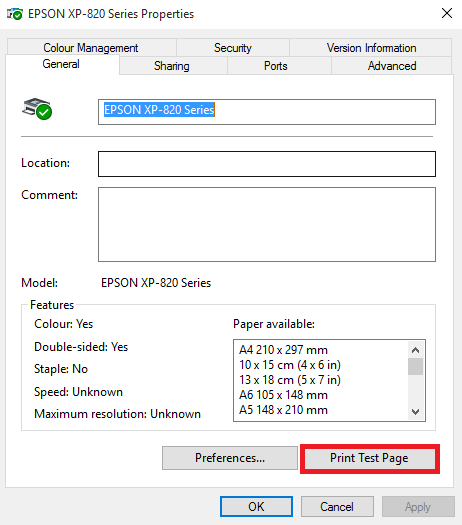
- Click or tap Printer properties. The window opens on the General tab.
- Load a sheet of plain A4 paper into the sheet feeder/paper cassette.
-
Click or tap Print Test Page.
-
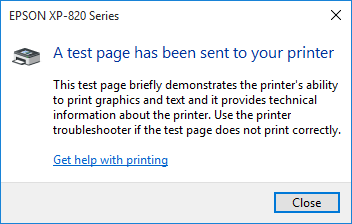
A Test Page is sent to the printer and a confirmation window appears. If the Test Page prints successfully, click or tap Close.
-
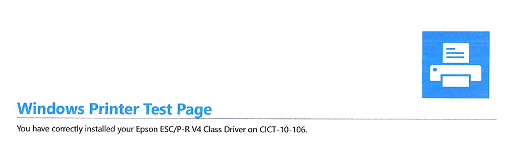
An example of a successful Test Page is shown below.
If there is banding in the text on the Test Page, or the print quality is poor, Head Cleaning may be required — see KA-01531: When to Clean Your Print Head.
Windows 10
- At the bottom left of the screen, click or tap the Start button.
- Click or tap Settings.
- Click or tap Devices.
-
On the next screen, click or tap Devices and Printers from the bottom of the window.
Before continuing:
- Check the connection from the printer to the computer.
- Check the printer is powered on.
- Make sure there are no red or amber lights on the printer's LEDs, and no error messages on the LCD panel.
-
The Devices and Printers folder opens. An icon for your Epson printer should be present.
Note: If an icon for your Epson printer is not present, the driver is not installed. Install it using the method in KA-01352: Epson and Windows.
- In the Printers folder, check the print queue is clear and the printer status is Ready — see KA-01084.
-
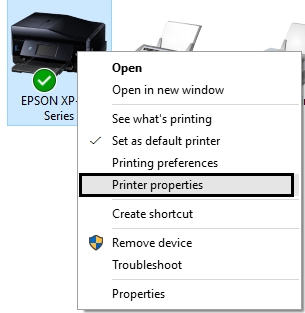
Right-click or tap-and-hold the printer icon and select Printer properties. The window opens on the General tab.
- Load a sheet of plain A4 paper into the sheet feeder/paper cassette.
-
Click or tap Print Test Page.
-
A Test Page is sent to the printer and a confirmation window appears. If the Test Page prints successfully, click or tap Close.
-
An example of a successful Test Page is shown below.
Video tutorial available: How to Print a Test Page in Windows 10 — watch here. (Video content is supplementary; the written steps above are the primary reference.)
If there is banding in the text on the Test Page, or the print quality is poor, Head Cleaning may be required — see KA-01531: When to Clean Your Print Head.