Can I scan X-ray film with my Epson scanner?
RELATES TO:
- Epson scanners capable of scanning film
- Scanning large photographic film and X-ray film
EXPLANATION:
Yes. It is possible to scan X-ray film with Epson scanners, but please take the following into account:
- X-ray film can exceed the Dynamic Range of commercially available flatbed scanners. The 'Dynamic Range' is the ratio of the lightest signal (e.g. brightest highlights in an image) which a scanner can record to the darkest signal (e.g. deepest shadows in an image). In these instances some adjustment may be required and some information, such as shadow detail, may be lost. The higher the dynamic range, the more information you can get from the darkest areas of the film.
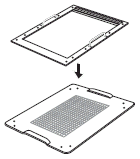
- As Epson do not provide film holders for X-ray film sizes, you may need to create your own. By correctly positioning the film and holding it above the glass document table, a film holder helps to prevent 'Newton ring' interference patterns, as well as other image quality issues such as dark colours due to the calibration area being blocked, and jagged lines due to incorrect document orientation.
Recommended models:
- For larger X-rays up to 8" x 10", we recommend an Epson scanner with a large readable area (203 x 254 mm) that comes supplied with a film area guide, such as the Perfection 4990, V700 Photo, V750 Pro, V800 Photo or V850 Pro. Other models may be suitable, but have a smaller readable area within the transparency unit/film adapter window, for example the Perfection 4870, Perfection 2450 and Perfection 3200. For more information, please check the Product Information/Technical Specifications section of your scanner's User Guide.
- Large photographic film or large X-rays such as dental panoramic X-rays (typically 5 x 11 inches) may be unsuitable for scanning on most Epson scanners. Scanning film, including X-rays, larger than the maximum supported film size is not recommended. For film larger than 8 x 10 inches, we recommend using an A3 Epson scanner such as the Expression 10000XL Pro or 11000XL Pro Photo as this model supports a film size up to 12.2 x 16.5 inches.
SOLUTION:
Follow the steps below to scan X-ray film using EPSON Scan. For assistance with third-party software, refer to the application's documentation or visit the manufacturer's website.
Setting the material for scanning
- Make sure the film is set off the glass and is aligned correctly on the document bed. If you are using the Perfection 4990, V700 Photo, V750 Pro, V800 Photo or V850 Pro, place the film in the film area guide and follow the instructions in the "Placing Film" section of your scanner's User's Guide.
 Note:
Note:- You cannot use DIGITAL ICE Technology when scanning film with the film area guide.
- When scanning using the film area guide, striped rings (Newton rings) may appear in your scanned images.
- Place the film on the document bed with the shiny base side facing down.
- Make sure the scanner's calibration area is not covered. Obstructing this area will affect the colours in your scans. Epson film holders incorporate a cut-out to make sure this area is not obstructed. Refer to the image below for an example of how to locate the calibration area.
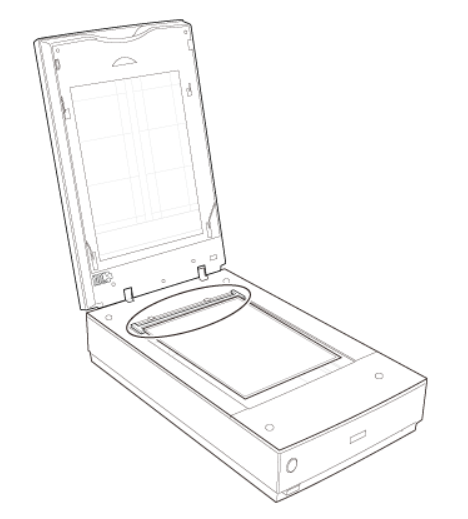
- Make sure you have removed the document mat, then close the scanner cover.
Recommended settings in EPSON Scan
We recommend selecting all the settings that are common to scanning X-rays and saving them as a new custom setting. Follow the steps below:
- Open EPSON Scan and select Professional Mode.
- Select Film as the Document Type. If you have constructed your own film holder, select Film or Film (with Film Holder). If you are using the film area guide with the Perfection 4990/V700/V750 Pro/V800/V850 Pro, select Film (with Film Area Guide).
- Select Positive Film as the Film Type. X-rays are typically scanned as a positive film type in order to preserve the same appearance in their digitised format.
- Set the Image Type to 24-bit Color and the Resolution to 360 dpi. Some types of film may scan better with a different Image Type setting, for example '8-bit Grayscale' or '16-bit Grayscale'. You may need to experiment to see which Image Type gives you the best results.
360 dpi is an optimum resolution for printing quality images. Select Original as the Target Size and then specify the exact size of the original film. Next, set the Scale to be the final size of the image you want to output.
- At a scaling of 100% (actual size) a scan of a 1 x 1½" X-ray will produce a printed image of 1 x 1½" and a screen image of roughly ¼ of the screen area.
- At a scaling of 200% a scan of a 1 x 1½" X-ray will produce a printed image of 2 x 3" and a screen image of roughly the screen area.
- At a scaling of 400% (actual size) a scan of a 1 x 1½" X-ray will produce a printed image of 4 x 6" and a screen image of roughly 4 times the screen area. Most image viewing software will automatically resize the image to fit the screen.
- Click on the [+] plus button beside Target Size to expand the options. Select the Target Size unit as inches (in.) or mm. This allows you to visualise the final results more easily. Select the Scale option as a percentage using the guidelines above. We recommend using the percentage scale rather than the 'Image Size' option as it does not lock the aspect ratio.

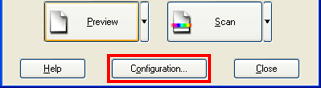
- Click the Configuration button. For best results, select Colour Control and Continuous Auto Exposure. EPSON Scan will set the exposure according to the darkest and brightest points in your image. Then click OK.
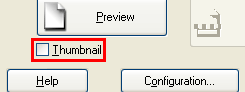
- Ensure that the preview is set to Normal instead of Thumbnail. You can change the preview type one of the following ways, depending on your version of EPSON Scan:
- Click the arrow next to the Preview button and select the preview type you require, in this case 'Normal', or;
- For a 'normal' preview, make sure that the 'Thumbnail' checkbox below the Preview button is not ticked. If you want to re-enable the thumbnail preview when you have finished scanning X-rays, simply click in the checkbox to tick this option.
The next step is to save the settings before scanning.
Saving the Settings
We recommend saving your selections as a custom setting, so you can quickly choose the same options again the next time you scan an X-ray.
There are two methods to save the selected settings depending on the version of EPSON Scan:
- Click on the Save button. This will save the settings but will give a pre-assigned name such as 'Setting 1'. Make a note of this name for future use.
- If the Save button is not highlighted then highlight the text Current setting and type in a unique title such as "X-ray settings". When you next use EPSON Scan to scan X-Ray film, select this custom name to restore your saved settings.

Scanning X-ray film with EPSON Scan
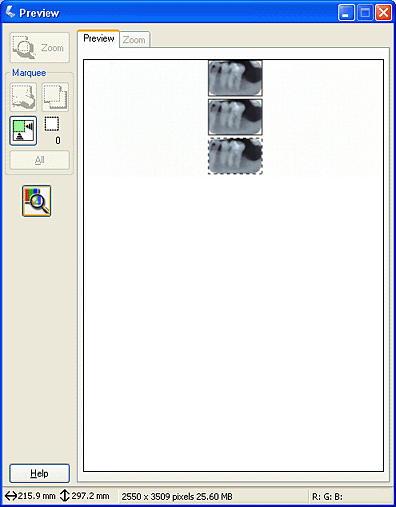
Place the film on the document table or in a film holder/film area guide. Click on Preview to perform a pre-scan. EPSON Scan prescans your images and displays them in the normal Preview window.
Example of an X-ray image displayed in the Preview window
 |
 |
Copy marquee button. To draw multiple marquees (up to 50; Normal preview only), you can draw them all manually as described below, or click the copy marquee icon to create additional marquees of the same size. |
 |
Delete marquee button. To delete a marquee, click inside it and click the delete marquee icon. | |
 |
Selects all marquees. |
- Select the scan area by drawing a marquee around the X-ray. If you are scanning multiple X-rays, select the scan area of each X-ray image individually.
- To select your scan area, draw a marquee that marks the edges of the scan area on each image. You can move and resize the marquees to change the scan areas as necessary. Be sure to select all the marquees before scanning.
- Be careful to select only the image itself and not the surrounding area. If the selected area contains information outside the X-ray film then that information will be included in the exposure calculation and may result in an inaccurate exposure.
The Zoom function simply zooms into the selected area to allow more accurate cropping. You can navigate back to the Preview window by clicking the Preview tab at the top of the window.
- Make any desired image adjustments before scanning. See your scanner's user guide for more information.
- When you have finished adjusting the scan areas and making any further adjustments and settings, click the Scan button to scan your images.
If you experience problems scanning film, either with the scanning operation or scan quality, please see the user guide from the Epson website for further assistance.