Pro Displays: What is the Light Source Calibration function?
- EB-L730U / EB-L735U / EB-L630U / EB-L530U / EB-L635SU / EB-L720U / EB-L520U / EB-L520W
- EB-L630SU / EB-L635SU
- EB-L615U / EB-L610U / EB-L510U / EB-L400U / EB-L610W
- EB-L1050U / EB-L1070U / EB-L1075U
- EB-L1000U / EB-L1100U / EB-L1105U / EB-L1200U / EB-L1300U / EB-L1405U
- EB-L1500U / EB-L1505U
- EB-L1490U / EB-L1495U
- EB-L1510S / EB-L1515S / EB-L1710S / EB-L1715S
- EB-L1500UH / EB-L1505UH / EB-L1750U / EB-L1755U
- EB-L12000Q / EB-L12002Q / EB-L20000U / EB-L20002U
- EB-L25000U / EB-L30000U / EB-L30002U
- EB-PU1006W / EB-PU1007B / EB-PU1007W / EB-PU1008B / EB-PU1008W
- EB-PU2010B / EB-PU2010W
- EB-PU2220B / EB-PU2120W
- EB-PU2216B / EB-PU2116W / EB-PU2213B / EB-PU2113W
Laser Technology
In summary, the EB-L series uses a Laser Light source instead of a convential lamp. This provides higher image quality, flexibility of install and reliabilitiy. In addition, there is no requirement to change the light source and provides a lifetime of up to 20,000 hours*1 with little maintenance*2.
Laser projectors are products capable of producing close to absolute blacks and wider color gamuts.
How does it work?
The image on the right visually depicts the inner workings of 3LCD Laser Phosphor technology.
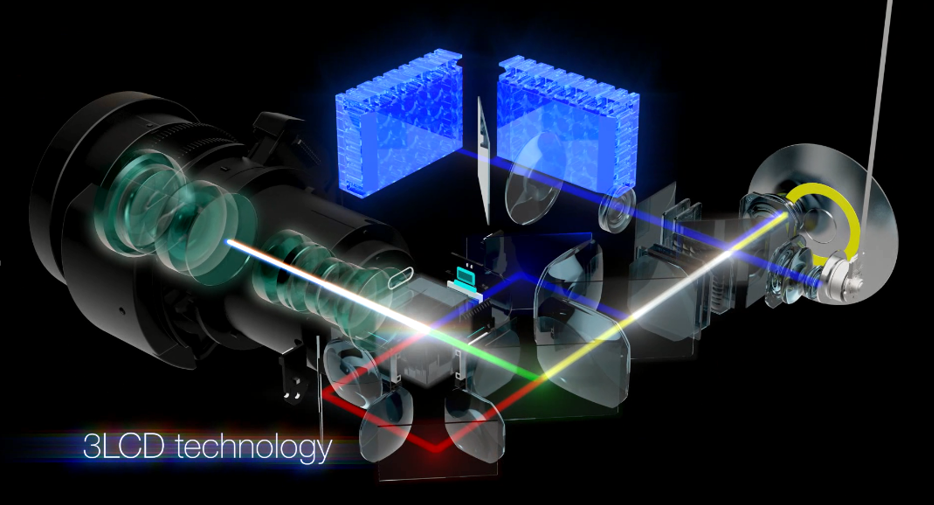
Blue light is ommitted from the two laser banks and are seperated via a beam splitter, this divides the light into two blue laser beams.
One beam reflects of a spinning phosphor wheel where it is changed into yellow light, the other blue laser beam reflects of a spinning diffuser wheel changing it to blue light. The yellow and blue light are then combined making white light.
This white light is then separated into red, green and blue through dichroic mirrors. After this, each of the three colors pass through LCD panels, producing three individual images.
Finally, these three images are transmitted through a prism and combined into the final full-color image.
Lifetime
One of the biggest advantages is the lifetime of laser phosphor projectors. The laser light source declines steadily and in a linear fashion. By contrast, a conventional lamp-based projector suffers from a sharp initial brightness decline, which levels out steadily.
With lamp-based models after exchanging the lamp, the full brightness is not restored, due to the degradation of other optical components in the chain (LCD panels, polarisation filters etc).
Light Source Calibration
The EB-L series will carry out a light source calibration every 100 hours which helps keep the linear degradation consistent – this is why it is an important function and in addition, it is recommended that the Light Source Calibration is performed or scheduled to ensure the projector is well optimised for use.
|
To perform a manual Light Source Calibration:
- Press the menu button on the remote or projector control panel
- Select the Reset menu, followed by Light Source Calibration.
- Select Run Now to start the Light Source Calibration.
|
For the following series:
To perform a manual Light Source Calibration:
|