Error "E1460-B305" / "E583-B308" occurs when connected to a USB 2.0 port
Problem
Error code "E1460-B305" or "E583-B308" is received while an Epson device is connected by USB to a computer that supports USB 3.0.
Affected USB 3.0 Models
Business Inkjet Printers
- WF-C869R/C869Ra
- WF-C8610, WF-C8690/C8690a
- WF-C878R/C878Ra, WF-C879R/C879Ra
- WF-C20590/C20590a, WF-C17590/C17590a
- WF-M20590
Scanners
- DS-310, DS-320, DS-360W, ES-200, ES-300W/300WR
- DS-530/535/535H, DS-570W, DS-770/775, DS-780N, DS-865, DS-870/875, DS-970/975, ES-400, ES-500W/500WR, FF-680W
- DS-1610, DS-1630, DS-1660W
Cause
This problem is caused when a USB 3.0 supported Epson device is connected to a computer that supports USB 3.0 but is either connected to a USB 2.0 port or is connected to a USB 3.0 port using a USB 2.0 cable.
|
This problem does not occur on computers that only support USB 2.0. |
Solutions
Temporary Solution 1
Connect the device to a USB 3.0 port using a USB 3.0 cable.
|
USB 3.0: Inner resin of USB cable connector is blue |
Temporary Solution 2
Disconnect the USB cable from your computer and try another USB port.
Permanent Solution
Prerequisites for implementation
Before following the below procedure, make sure that the following conditions are met:
- The scanner driver that corresponds to the configuration of the model must be installed correctly.
- The firmware of the target model must be the version compatible with the settings.
- The device must be connected via a USB 3.0 cable and recognised as normal.
Procedure
- Launch EPSON Scan Maintenance Utility.
- Open the following folder in Explorer.
C:\Program Files (x86)\epson\Epson Scan 2\Utility Note:
Note:In 32bit Windows, there is no folder above, so open the following folder.
C:\Program Files\epson\Epson Scan 2\Utility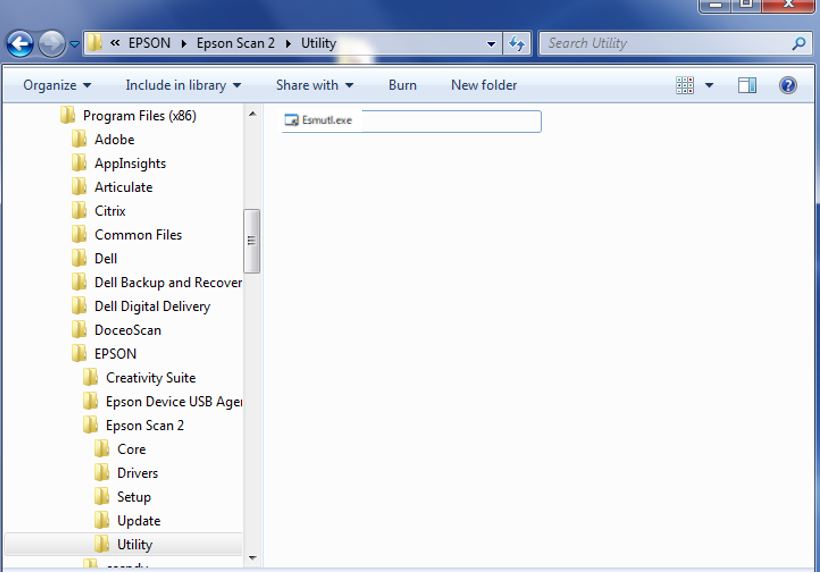
- Hold down Control (Ctrl) key on your keyboard and double-click “Esmutl.exe” to launch it.
The control key shall be held down until the "UAC (User Account Control) Dialog" is displayed and the "Maintenance Utility Main Screen" is displayed.
Make sure that the "Scanner Settings" button is displayed on the screen when you start up. If the button does not appear, press the "Close" button to exit the utility and restart it again.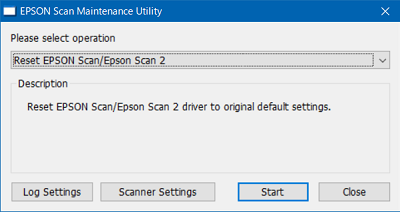
- Open the following folder in Explorer.
- Change the USB2.0 compatibility settings of the scanner
- Press the "Scanner Settings" button on the main Utility screen to display the Scanner Settings screen.
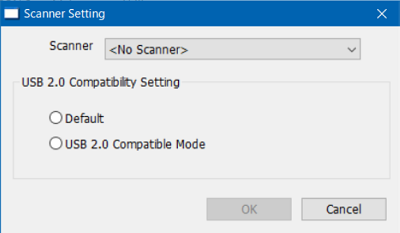
- In the USB 2.0 compatibility setting group box, change to "USB 2.0 Compatible Mode" and press the OK button.
- Confirm that the following message is displayed.
“The scanner settings are complete. Turn the scanner off and then on again.”
- Close the dialog and turn off the printer/scanner.
- Press the "Scanner Settings" button on the main Utility screen to display the Scanner Settings screen.
- Check the current printer and scanner settings
- Start the EPSON Scan Maintenance Utility according to step 1.
- Display the "Scanner Settings" dialog by following step 2a.
- The current USB 2.0 compatibility setting will be selected when the printer/scanner is selected according to step 2b.
Troubleshooting
- If "No Scanner" is displayed in the "Scanner Settings" drop-down list
The following are possible causes:
- The scanner driver has not been installed properly.
- The PC and printer/scanner are not connected properly.
Follow the product manual to install the scanner driver and make sure it is connected to your PC.
- The following error message is displayed when OK is pressed on the "Scanner Settings" dialog.
"Failed to set USB2.0 compatible mode setting"
The following are possible causes:
- The scanner driver has not been installed properly.
- The PC and printer/scanner are not connected properly.
- Printer and scanner firmware do not support the setting.