How do I configure the scanner button for EPSON Event Manager?
You can customise the push-scan button feature to open a program in the Epson Event Manager to make scanning even quicker. You can make specific scan settings such as the document type, original Size, Image Type, Resolution, Target Folder, File Format and other actions.
Assigning a Program to a Scanner button in Epson Event Manager
- Do one of the following to start Epson Event Manager:
- Windows: Select the Start button or Start > Programs or All Programs > Epson Software > Event Manager.
- Mac OS X: Select \Applications\Epson Software, and double-click the Launch Event Manager icon.
- You see the Button Settings tab in Epson Event Manager. The button and action options you see here depend on your scanner/All-In-One model. If your product has one button, you will have one button action drop-down menu.
- For some models, you will need to select your scanner from the Scanner drop-down menu.
- Click the arrow in the list next to the action name (e.g. Scan to PC, Scan to PDF, or Scan to Email), then select the action you want to assign.
- If you want to add the action, click Make Job Settings. Enter the Job Description and make the necessary Scan Settings, and then click OK.
- After you finish the job settings, go back to the previous step and select the action you set.
- If you are using a network-capable All-In-Ones on a wired (Ethernet) or wireless network, you will need to make sure that the check box beside Enable Network Scan is ticked in the Network Scan Settings dialog. This is located at the bottom of the Button Settings tab. This will allow you to use the push-scan feature over the network.
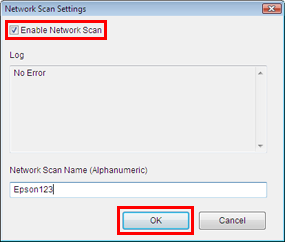
- You can also change the Network Scan Name. We recommend setting a unique, recognisable name on each computer that will use the All-In-One e.g. 'MaryPC1', 'Computer1', 'Computer2'. Click OK and close the Button Settings window. Check this on each computer that will access the All-In-One via the network.
Also make sure that the EPSON Event Manager icon is displayed in the notification area of the Windows taskbar/system tray before you press the push-scan button. To use the Scan to PC function(s), EPSON Event Manager needs to be ready to scan.

- Click Close to close the Epson Event Manager window.
Extra Troubleshooting for Windows Users
If you experience problems using this feature, make sure that the EPSON Event Manager icon is displayed in the notification area of the Windows taskbar/system tray before you press the push-scan button. If you experience problems using this feature but you can scan with EPSON Scan, see the section below.
If it is not displayed: The Windows taskbar has a setting that allows you to hide inactive icons to help keep the notification area uncluttered by hiding icons that you have not clicked recently.
- Open EPSON Event Manager from the shortcut icon the Desktop (or All Programs/Programs in the start menu).
- Now check if the icon is displayed in the notification area of the taskbar. If it's displayed, try using the Scan to PC feature(s) again.
- If it's not displayed, right-click on the notification area (near the clock) and select Properties. If Hide inactive icons is ticked, either untick it to show all icons or click on Customize and set the EPSON Event Manager icon to 'Always show'.
- Open EPSON Event Manager from the