How to check and change the printer port setting in Windows
If the printer has failed to respond to a print command, the printer driver port may not have been configured correctly. A port is an interface channel used for transferring data from the computer to a printer. In order to communicate and print successfully, the port setting in the printer driver software must be set correctly.
Some users may receive an error message that indicates an issue with the port settings. For example, if you are using a printer via a USB or network connection and receive the error message "There was an error writing to LPT1", this would indicate that the print data has been sent to a port that Windows reserves for printers connected via a Parallel interface.
In order to determine if the port is set correctly, we recommend checking the printer port setting in the printer driver and changing it if necessary. However, we recommend that you first follow the guidance in the following Related Article, returning to this article if advised to do so:
|
Windows 10, Windows 8 and Windows 7 operating systems do not support FireWire connections. The Epson printer must be used via a Parallel, a USB, or a network interface (e.g. Ethernet, integrated Wi-Fi, a suitable Epson print server or Windows printer sharing). |
Open the Printers folder and confirm the current port setting in the printer driver
-
Open the Printers or Devices and Printers folder. An icon for your Epson printer should be present.
- If you require help with this step, see the following Related Article: How to open the Devices and Printers folder in Windows
 Note:
Note:If an icon for your Epson printer is not listed, the driver is not installed. Install the printer software from the CD-ROM or download it from the Epson website or using the Add a Printer Wizard if your printer has inbox driver support.
See the following Related Articles for support information:
If there is more than one icon or port stacked drivers for your Epson printer, such as 'EPSON XP-820 Series' and 'EPSON XP-820 Series (Copy 1)', see the articles below for help and return to this article if necessary:
-
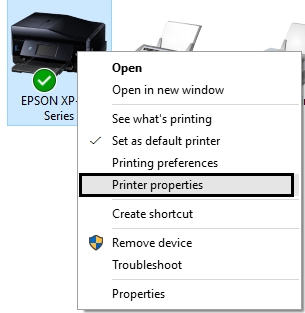
Right-click on the Epson printer icon and left-click on Printer Properties.
- The Properties window for your printer opens. Click on the Ports tab.
-
Check the port setting in the white box under 'Print to the following port(s)?'. The Port and Description columns indicate the type of port that the driver is set to use.
Figure 1: In this example, a printer is set to LPT1:
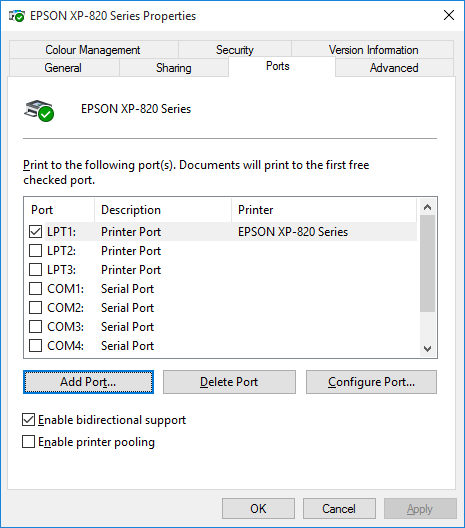
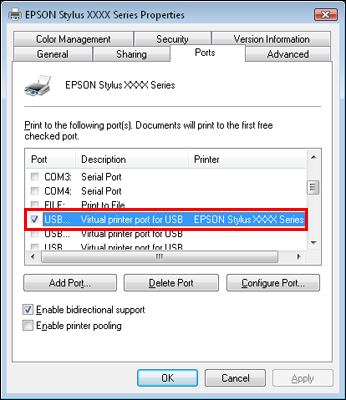
Figure 2: In this example, the printer port has been changed by selecting a USB Virtual printer port (e.g. USB001).
Check the printer port setting is correct
-
The port setting must be correct for the way your computer connects to the printer.
- For a printer connected to the computer via USB, the Port should be set to USB Virtual Printer Port (such as USB001, USB002).
- For a printer connected to the computer via Parallel, the Port should be set to LPT1 (or LPT2, LPT3 if you have more than one Parallel interface port on your computer).
-
For a printer connected to a network via a network interface (wired Ethernet or wireless), the Port should be set to EpsonNet Print Port. The port in the list which is ticked should indicate this - for example the Description column may display the printer's IP address (e.g. that starts 192.xxx.xxx.xxx - or 172.xxx.xxx.xxx for corporate networks).
Check that the correct IP address is listed. You can check the current IP address assigned to the Epson printer or print server by printing a network status sheet or locating the device via EpsonNet Config.
-
If the port is set correctly, test the communication between the printer and computer by sending a test page to the printer. However, if the port is not set correctly, for example the port is LPT1 when it should be USB, click into the box beside the correct port for your printer then click Apply (see Fig. 3).
- If your printer is using a USB or Parallel interface but you cannot find the required port setting, try scrolling down the list. If the correct port is not listed, move to the section The required printer port setting is not listed.
- If your printer is using an network interface (wired Ethernet or wireless), you may need too add the correct port or change the EpsonNet Print Port setting to 'Automatic', so network communication is still available even if the printer's IP address changes. Click on the button below to view instructions on adding the port.
- If you do not have an EpsonNet Print Port available in the ports list. Follow How to add an EpsonNet Print port in Windows for instructions about how to download and install an EpsonNet Print Port.
Adding the printer port for network printers
-
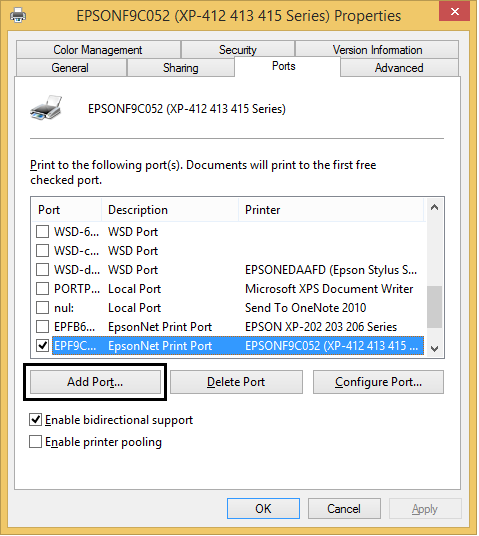
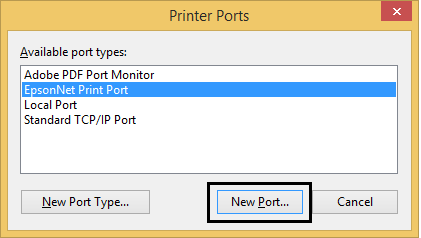
In Ports, click on Add Port.
-
A window will appear with a choice of ports to add, click on EpsonNet Print Port from the list, and then click on New Port.
 Note:
Note:If you do not have the choice of EpsonNet Print Port, this means that EpsonNet Print has not been installed. EpsonNet Print Port is recommend where possible. Refer to article How to add an EpsonNet Print port in Windows for further assistance.
-
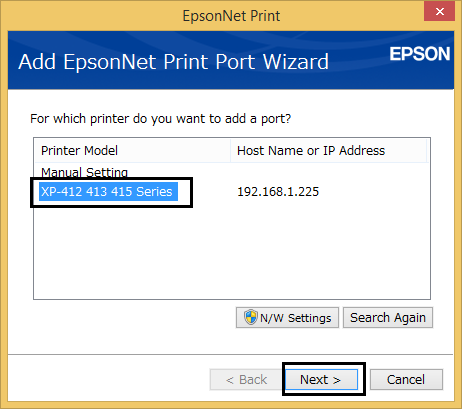
The Add EpsonNet Print Port Wizard will appear, displaying a list of printers detected on the network. Select the target device (printer or All-In-One) from the list, and then click Next. If the target device is not in the list, click Search Again.
-
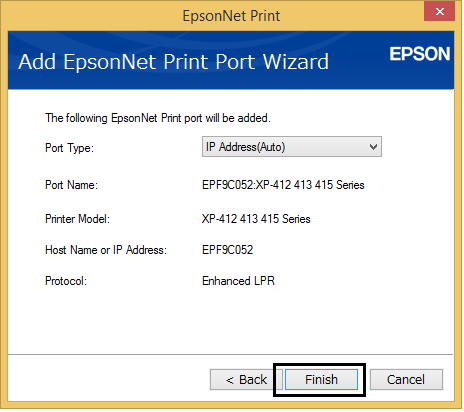
The summary of the device and port will be displayed. We recommend setting the Port Type to IP Address(Automatic) as this means the port will not have to be reconfigured if the printer's IP address changes (if your router allocates IP addresses automatically using DHCP). Click Finish. If your router has DHCP turned off, requiring you to allocate IP addresses manually, select the Port Type to 'IP Address(Manual)'.
- It will return to the Add Port window, click Close.
- In the Ports window, locate the port you added - it should display the port name or IP address. Click into the checkbox beside it to select it, and then click on Apply to set the port.
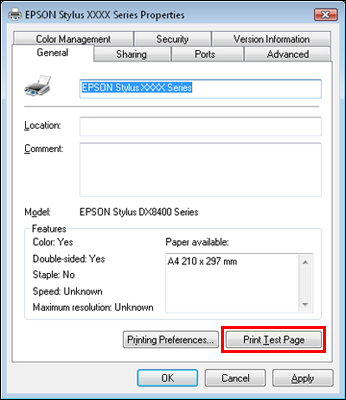
- The printer driver should now be configured, try printing a Test Page from the General tab to test this. Refer to How to print a Test Page in Windows
- Click OK to close the printer Properties window.
Test Page Prints:
-
Make sure that a sheet of plain A4 paper is loaded into the printer's paper tray. Try to print a Test Page from the Printer Properties > General tab. Click on Print Test Page from the bottom of the window:
- Using the Test Page function is a good way to test the communication between the printer and computer. Follow the appropriate section below.
- If the Test Page prints, printing from Windows programs should now be normal.
- If printing is possible but you continue to experience problems, return to the following Related Article for a solution:
- Troubleshooting Printer-related Communication Issues in Windows
Test Page Fails to Print:
- If a printer connected via a USB interface fails to print and the port is already set to USB Virtual Printer Port, do the following:
If these steps fail, return to the following Related Article for a solution:
- Check the cable connection between the printer and the computer port.
- Open the Devices and Printers folder. For further assistance refer to How to open the Devices and Printers folder in Windows
- Right-click on the Epson printer icon then left-click See What's Printing.
- If a document is listed in the queue, cancel it by clicking on the Printer menu then Cancel All Documents.
- Restart the computer before printing again.
- Should this fail, cancel the document and restart the computer.
- In Devices and Printers, open the Printer Properties.
- In the Ports tab, change the port setting to a different USB Virtual Printer Port.
The required printer port setting is not listed
- If the printer is connected to the computer via a USB interface connection and the port setting you require is not listed then check that the computer system has sufficient USB support.
- If the printer is connected via Parallel, ensure that the LPTx port (e.g. LPT1) is not disabled in Device Manager.
- In the event that one of the above is true, return to the following Related Article:
-
If the printer is connected on a network, ensure that you have configured the network interface correctly.
- We recommend a printer using an Epson network interface is set to use the EpsonNet Print Port. See your product manual for instructions on setting up the printer on a network and configuring the network interface.
- With the exception of the Stylus SX405 Wi-Fi Edition, Epson do not support third party external print servers - refer to the print server manufacturer's documentation for help.